The purpose of my project was to develop a chat system for my portfolio site because I needed to hear from new employers and clients. The final product took the form of the following design:
Why Rocket.Chat, you may ask?
A great choice is the Rocket.Chat solution for the following reasons:
- This software solution comes with two major benefits: complete freedom from cost and the ability to modify it any way you wish.
- Traditional Application Programming Interfaces through their platform enable easy implementation.
- Users have the choice to host Rocket.Chat independently or make use of their cloud offering with a trial period for testing purposes. We will utilize their cloud service in our evaluation.
Prerequisites
You need to know and obtain several details before proceeding.
- A running Rocket.Chat server (either self-hosted or on Rocket.Chat Cloud). I will now demonstrate steps for creating this platform through Rocket.Chat Cloud.
- A working knowledge of JavaScript fundamentals.
Getting Started
We need to begin with the installation of a Rocket.Chat server. Users have two options to deploy their server: they may choose to establish their own or utilize the cloud service of Rocket.Chat. For this tutorial you do not need to pay anything because Rocket.Chat provides a free 30-day trial period.
Step 1: Set Up the Rocket.Chat Server
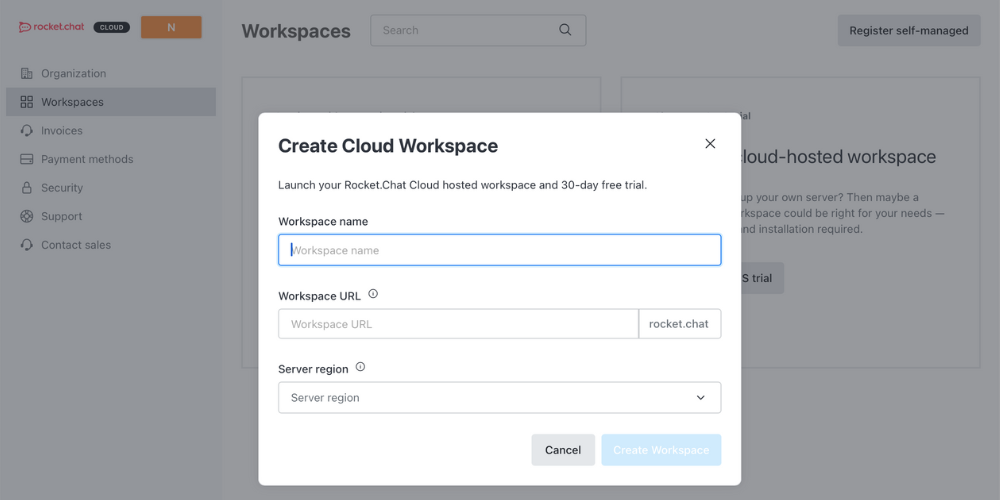
Users can obtain their free account by navigating to https://cloud.rocket.chat.
You must log into the account then select the “Change to SaaS trial” button to begin the server launch process.
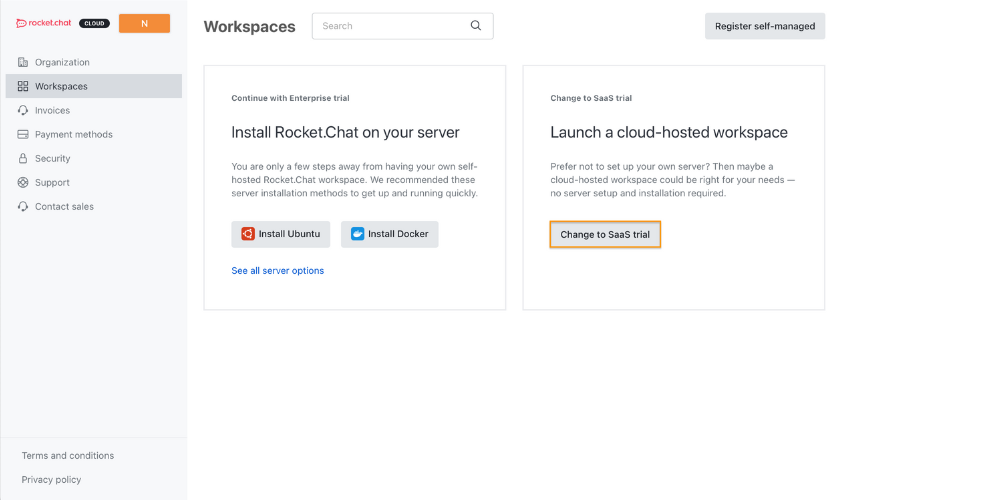
The first step involves setting up a Cloud Workspace through the entry of your workspace name together with URL and selecting the proper server region.
The installation process requires some time before completion. After completion you will notice an interface matching this one:
Step 2: Configure the Rocket.Chat Server
The following steps must be configured on our server to enable the livechat API usage.
Begin by opening your Rocket.Chat
server where you should click the menu button followed by Omnichannel.
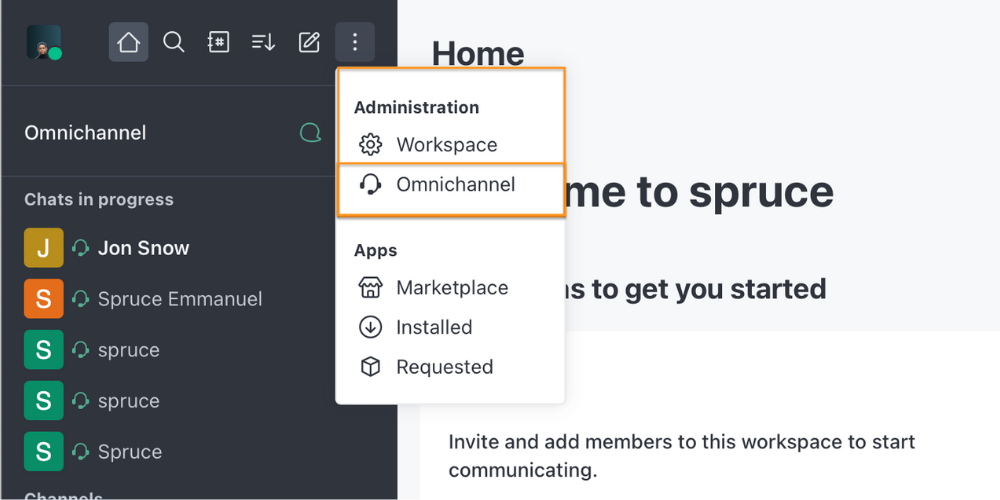
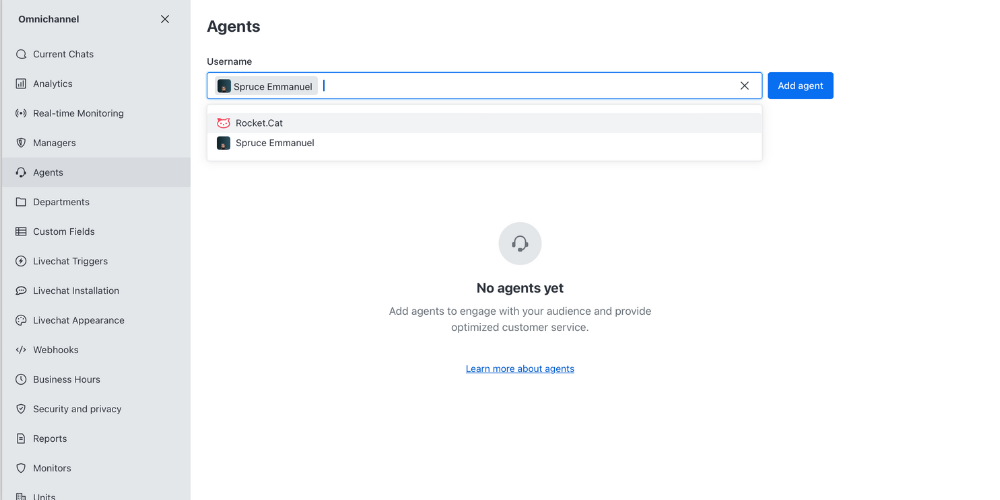
Users should select Agents from the sidebar menu before adding themselves as an agent.
Select Departments from the screen and start making a Department with the name Chats. I’ll call mine Chats.
The next step requires establishing several settings regarding the Livechat widget functionality.
- Enable the offline form and specify the email address for sent offline messages.
- Set your business hour availability under proper configuration of your Livechat widget.
Step 3: Register the Visitor
The system requires visitor registration while it generates a specific space for them. Collecting visitor names and emails along with creating a distinct random ID serves to perform this task.
How to Register the Visitor
The server requires visitor registration as the first step. The system requires visitor information containing their name together with their email and token. To register the visitor you must send request information through the URL: /api/v1/livechat/visitor
. The following example shows code which your backend could transmit:
const body = {
name: "Visitor Name", // Replace with the visitor's name
email: "visitor@example.com", // Replace with the visitor's email
token: "unique-visitor-token" // Replace with a generated unique token
};
fetch(`${process.env.ROCKETCHAT_URL}/api/v1/livechat/visitor`, {
method: 'POST',
headers: {
'Content-Type': 'application/json',
'Cache-Control': 'no-cache'
},
body: JSON.stringify(body)
})
.then(response => response.json())
.then(data => {
if (data.success) {
console.log("Visitor registered:", data);
} else {
console.error("Visitor registration failed:", data);
}
})
.catch(error => console.error("Error in visitor registration:", error));
How to Create or Retrieve the Chat Room
You must generate a room after registering the visitor to enable message exchange between both parties.
To create a room the endpoint /api/v1/livechat/room
should be called while passing the visitor token as a query parameter. The API will either return the pre-existing room for the visitor or create a new one. Else a fresh room will be established. The following request allows you to create such a request within your backend system.
const token = "unique-visitor-token"; // Replace with the actual visitor token
fetch(`${process.env.ROCKETCHAT_URL}/api/v1/livechat/room?token=${token}`, {
method: 'GET',
headers: { 'Content-Type': 'application/json' },
})
.then(response => response.json())
.then(data => {
if (data.success) {
console.log("Room retrieved:", data);
} else {
console.error("Failed to retrieve room:", data);
}
})
.catch(error => console.error("Error in retrieving room:", error));
How to Retrieve Livechat Configuration
We need to retrieve the essential information about the registered visitor alongside the registered agent. You can obtain the visitor token together with room ID and agent information using this API endpoint. This API enables you to verify that the agent remains online prior to attempting WebSocket connection.
const token = "unique-visitor-token"; // Replace with the actual visitor token
const url = `${process.env.ROCKETCHAT_URL}/api/v1/livechat/config?token=${token}`;
fetch(url, {
method: 'GET',
headers: { 'Content-Type': 'application/json' },
})
.then(response => response.json())
.then(data => {
if (data.success) {
console.log("Livechat config:", data);
} else {
console.error("Failed to get livechat config:", data);
}
})
.catch(error => console.error("Error fetching livechat config:", error));
Step 4: Create the Connection to WebSocket
Establishing the live chat requires opening a WebSocket connection to Rocket.Chat
while managing messaging capabilities.
WebSocket Connection Example
First, open the WebSocket like this:
const rocketChatSocket = new WebSocket("ws://example.rocket.chat/websocket");
Then connect:
const connectRequest = {
msg: "connect",
version: "1",
support: ["1", "pre2", "pre1"]
};
rocketChatSocket.send(JSON.stringify(connectRequest));
The connection remains active when you respond to server “ping”
messages using “pong”
messages.
rocketChatSocket.onmessage = (event) => {
try {
const data = JSON.parse(event.data);
if (data.msg === "ping") {
console.log("Received ping from server, sending pong");
rocketChatSocket.send(JSON.stringify({ msg: "pong" }));
}
} catch (error) {
console.error("Error parsing WebSocket message:", error);
}
};
Just use the visitor’s token and room ID from the previous sections to subscribe to the room created for the visitor. You should employ the existing visitor’s token together with room ID which you obtained during the earlier sections.
const subscribeRequest = {
msg: "sub",
id: "unique-subscription-id", // Replace with your unique ID
name: "stream-room-messages",
params: [
"fetched-room-id", // Replace with the room ID variable
{
useCollection: false,
args: [
{ visitorToken: "visitor-token" } // Replace with your visitor token variable
],
},
],
};
rocketChatSocket.send(JSON.stringify(subscribeRequest));
The device enables you to detect incoming communications. The following instructions outline how new messages get processed upon arrival.
rocketChatSocket.onmessage = (event) => {
try {
const data = JSON.parse(event.data);
if (
data.msg === "changed" &&
data.collection === "stream-room-messages"
) {
// Handle new messages
if (data.fields && data.fields.args && data.fields.args.length > 0) {
const newMessage = data.fields.args[0];
// Assume isValidChatMessage is defined to validate the message format
if (isValidChatMessage(newMessage)) {
// Update your messages list here
console.log("New message received:", newMessage);
}
}
}
} catch (error) {
console.error("Error parsing WebSocket message:", error);
}
};
Does the system offer a way to transmit live chat communications? Just use this code to do so:
const sendMessageRequest = {
msg: "method",
method: "sendMessageLivechat",
params: [
{
_id: "unique-message-id", // Replace with a generated unique ID for the message
rid: "room-id", // Replace with the actual room ID
msg: "Your message here", // Replace with the message text you want to send
token: "visitor-token" // Replace with the actual visitor token
}
],
id: "unique-request-id" // Replace with a unique request ID
};
rocketChatSocket.send(JSON.stringify(sendMessageRequest));
Conclusion
Your web application development should not find it difficult to include a Live Chat component. The livechat API provided by Rocket.Chat allows simple chat integration so you can obtain useful metrics about user behaviors. The SDK wrapper I created serves to simplify the utilization of the API.
Now it’s your turn! Implement an evaluation of Rocket.Chat APIs to construct your customized live chat platform. You will find additional information about Rocket.Chat in their documentation.
You can also read my ReactJs Beginners Guide
Happy coding!