This guide will explain the usage of Multer module from npm in a NestJs application. The application should incorporate features that make it easy for users to upload files. Your application can be set up to manage files securely without any complications in handling data.
Prerequisites
This is a hands-on guide. You need the following items to track the instructions: Node.js (V14 or above) and Node Package Manager (npm) along with basic knowledge of Node.js and NestJS and a code editor (such as VS Code) and NestJS CLI installed.
- Node.js (V14 or above)
- Node Package Manager (npm)
- Basic understanding of Node.js and NestJs
- A code editor, like VS Code
- NestJS CLI. You can establish the CLI by running the npm install -g @nestjs/cli installation command.
How to Setup the Project
Establish a new NestJs project based on the provided instructions.
$ nest new file-upload-example
The following command leads users to the project directory after new project creation.
$ cd file-upload-example
The next requirement is to install the NPM module called multer which serves as a middleware for file management. The middleware assists you to handle file uploads through middleware management.
$ npm install @nestjs/platform-express multer
The final step involves package installation of @types/express alongside @types/multer.
$ npm install -save-dev @types/express @types/multer
All necessary dependencies exist for our project which is now ready for implementation. Given the following instructions we will examine implementation of file upload functionality to this project.
How to Create a Resource for File Upload
The NestJs CLI aids developers when establishing resources that manage file upload functionality.
$ nest generate resource file-upload
Proceeding with the command generates three code files within the src directory: module, controller and service which facilitate file upload management.
The file-upload.module.ts centralizes file upload logic while file-upload.controller.ts processes incoming file upload requests and file-upload.service.ts executes the file upload procedures. Next we will modify the module and service from the resource while configuring the controller.
How to Configure the File Upload Resources
The following section comprises an analysis of configuring three critical files within file-uploads called file-upload.module.ts along with file-upload.controller.ts and file-upload.service.ts.
- file-upload.module.ts
- file-upload.controller.ts
- file-upload.service.ts
Module Configuration
					import { Module } from '@nestjs/common';
import { FileUploadService } from './file-upload.service';
import { FileUploadController } from './file-upload.controller';
import { MulterModule } from '@nestjs/platform-express';
import { diskStorage } from 'multer';
@Module({
  imports: [
    MulterModule.register({
      storage: diskStorage({
        destination: './uploads',
        filename: (req, file, cb) => {
          const filename = `${Date.now()}-${file.originalname}`;
          cb(null, filename);
        },
      }),
    }),
  ],
  controllers: [FileUploadController],
  providers: [FileUploadService],
})
export class FileUploadModule {}
The file-upload.module.ts contains this code declaration for specifying both file storage location as well as filename rules.
Controller configuration
					import {
  Controller,
  Post,
  UseInterceptors,
  UploadedFile,
} from '@nestjs/common';
import { FileInterceptor } from '@nestjs/platform-express';
import { FileUploadService } from './file-upload.service';

@Controller('file-upload')
export class FileUploadController {
  constructor(private readonly fileUploadService: FileUploadService) {}

  @Post('upload')
  @UseInterceptors(FileInterceptor('file'))
  uploadFile(@UploadedFile() file: Express.Multer.File) {
    return this.fileUploadService.handleFileUpload(file);
  }
}
This is the file-upload.controller.ts above. The code establishes a POST endpoint for dealing with file upload operations. The route enables file-upload functionality which transfers received files to the processing service.
Service configuration
					import { Injectable } from '@nestjs/common';

@Injectable()
export class FileUploadService {
  handleFileUpload(file: Express.Multer.File) {
    return { message: 'File uploaded successfully', filePath: file.path };
  }
}
The service handles the file and provides a response that contains the file path.
The Module and Service together with the Controller have been completed. The following step requires validation implementation to verify file dimension and type.
					import { BadRequestException, Injectable } from '@nestjs/common';

@Injectable()
export class FileUploadService {
  handleFileUpload(file: Express.Multer.File) {
    if (!file) {
      throw new BadRequestException('no file uploaded');
    }

    // validate file type
    const allowedMimeTypes = ['image/jpeg', 'image/png', 'application/pdf'];
    if (!allowedMimeTypes.includes(file.mimetype)) {
      throw new BadRequestException('invalid file type');
    }

    // validate file size (e.g., max 5mb)
    const maxSize = 5 * 1024 * 1024;
    if (file.size > maxSize) {
      throw new BadRequestException('file is too large!');
    }

    return { message: 'File uploaded successfully', filePath: file.path };
  }
}
Our configuration process for file upload has been completed.
How to Test the File Upload
Application feature building requires testing to be an essential component. We will conduct testing on our application through Postman. Any software can perform the required tests for file upload endpoint testing.
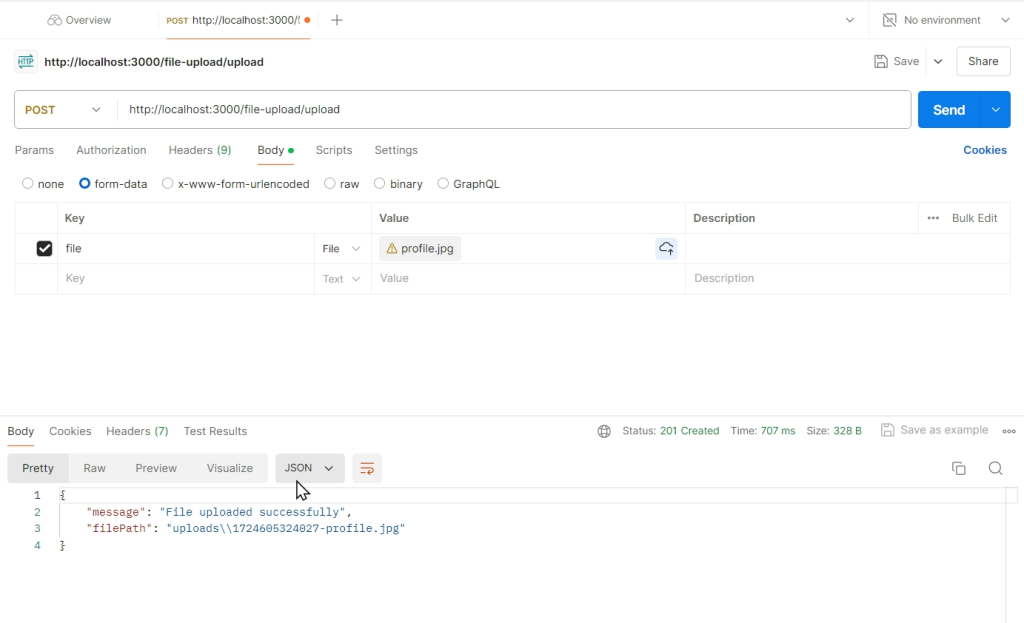
Verify the successful file upload through Postman by evaluating the response after you submit your request. Secondly check file-upload-example to see an uploads folder containing your uploaded file.
Conclusion
You have learned the process of file uploading through Multer in conjunction with NestJs. The provided information serves as your entry-level knowledge for Multer file upload implementation in NestJs projects. The system enables additional complex features including multiple file uploads together with other advanced features.
I found great satisfaction in our work with the demo and wish the best possible value emerges from this information.